7/11/2018
4/21/2018
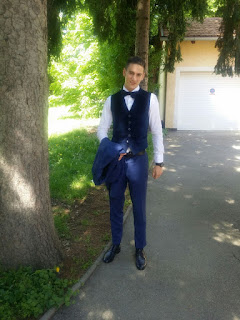
A vest for a young man
So, I had just cut out my (first) top for Faye's sewalong when my friend M called. She asked if I could alter suit pants for her son that were too large. I said yes. After that it turned out he also wanted a vest. Ok. And also he really, really wanted a bow neck tie. Oh, well...Ok.
So they came over and they brought velvet! Gosh. I just thought that I would pretend I knew what I was doing. :D ( I was slightly scared of the buttonholes to be made in the near future...on velvet...)
Of course, it wasn't only that the trousers had to be taken in, but he also wanted them Italian style. A bit more work. :)
For the vest I had to go through sewing two test muslins, because the guy is pretty tall and very very skinny. I used a pattern from a special edition of La mia Boutique for men as the base for drafting. The bow was the easiest thing to make, after some research.
And finally, it all turned out beautifully! Phew. I'm pretty proud of myself and the young man coudn't stop checking himself out in the mirror. :D I asked for a fancy photo of the whole outfit because Steph up here isn't the best of models for a men's vest.
Anyway, pretending to know what one is doing seems to be working well! :D
Now, the top....
3/24/2013
A skirt and a shirt
I love this skirt even though the color is totally wrong for me. It is the most worn of the season. :-)
Wonderfully soft and light fabric. The bow at the neckline is not exactly visible but it is there, and the pattern placement happened by accident. :-) In spite the hunchback optical illusion this shirt is a dream to wear.
Ciao!
9/16/2011
Blouse Burda 7/2007-101 in green and pants Burda 7/2010-127 in blue
I wanted to make this blouse fit, but I'm not really happy with it. There is more to do on the shoulder back and sleeves. Perhaps another time.
Here is the pattern with all the alterations ( lengthened bodice, forward shoulder, narrow back):


8/25/2011
Blouse Burda 7/2007-101


So nice, both the pattern and fabric! Why did it stay on the ufo pile for such a long time you wonder?
Here's why - I scorched the back piece with the iron! I don't know what kind of fabric this is, but it behaves strangely. Like organza, I'd say.
I was soooo very close to throwing the whole thing away! :-(

Then I dug it out in my big UFO busting spree. With rather satisfying results! :-)
The hole got mended. I ironed a little piece of interfacing on the back and then applied this piece of lace on the right side.
8/22/2011
A sewing plan?
So what's the plan, you ask? Destashing!

Green with blue dots viscose - shirt with bow ( this fabric is new)
Green velvet - high waisted skirt
For a change :-) the pants and skirt have already been cut out. :-) I still haven't decided which pattern to use for the shirt, I traced a couple of them. We shall see how the muslins turn out. When I get to them. After some more UFOs...
Planning any autumn sewing yet?
6/09/2011
Crossover top refashion
I did a stupid thing, though. Forgot to leave extra space for the hips, ehh... So it pulls up.
Fortunately it is a summer top! :-DDD
9/02/2010
Blue socks tutorial
Hello, dear readers! How are you today?
It was ironing day around here and while I was at it I took this pair of old and worn out socks to throw away. Then the obvious caught my attention! Why not deconstruct them and get a pattern? And also actually sew a pair of socks with a heel?
Here's how I did it:
1. Cut an old cozy sock around the fold and at the heel seam.
2. Find a piece of knit to refashion/reuse/recycle.
You can see I also matched the hems of the sock and fabric. This one used to be a skirt.
3. I cut the fabric directly around the sock pieces (did not make a paper pattern first) with a margin of 5 mm to serge. Of course, you can hand sew or machine sew them.
4. Pin together the heel pieces right sides in and serge.
Here you can see a serged heel and one turned to the right side.
5.On the long upper part of the sock mark the position to match the heel seam on both sides. I snipped the fabric a bit (over the yellow pin head).
6. Pin the pieces together right sides in and serge.
7. Ups! This pattern seems to have a problem. The heel seam falls under my heel! Which means the old socks were actually too short. Will have to adjust the paper pattern a bit (when I make it) to resolve this little issue.
8. Otherwise, it's a nice little sock.
Ehm, socks! :-)
Quick and easy project. Takes 15 minutes to complete.
Hope you enjoyed this little tutorial!
Have a nice and cozy evening wearing your new socks!


