Showing posts with label refashion. Show all posts

3/07/2013

Cardigan refashion

From this:


Big 80s bat wing cardigan - to this:

Fitted cropped jacket. :-)

I used my perfect shirt pattern to cut out the pieces. The bottom of the sweater became the body of the jacket, and the rest became the sleeves. I managed to use the existing bands everywhere except at the neck, where I sewed on a piece of knit found among remnants. The same fabric was used to make the bow.
Also, I added a button in between the two existing ones and added a snap at the neckline to keep the jacket closed.

I will happily wear the little jacket as a liseuse - bed jacket, to keep me warm at night. :-)

So, everything used in this project was repurposed and I'm pretty satisfied!

Ciao!

10/01/2011

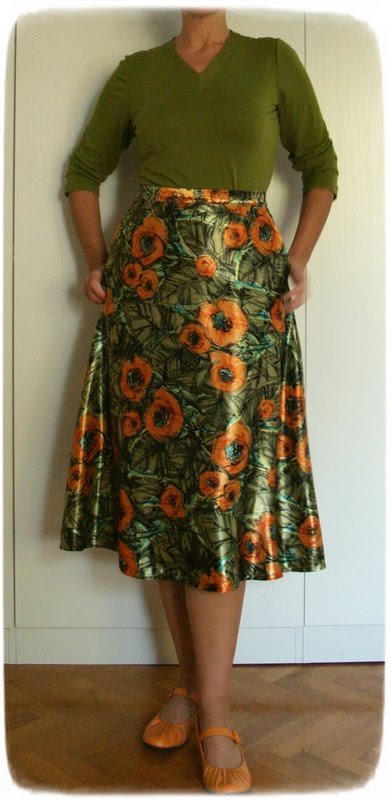
Olive green outfit - top and skirt

I have been quite productive in September and am very satisfied with the results. Also, I'm unusually sticking to my autumn/winter sewing plan. I have finished two more items!

The shirt that had to be refashioned. Enormous and with a shirt like insert.


I totally reconstructed it and also stitched up the flowery skirt to pair it with.


Look it has pockets!


Looks better tucked in or out?

A little detail of the button and hand stitched loop.


And now I should probably finally go and make that jacket and coat. Or two...

9/03/2011

Self stitched September '11 days 2,3 and a plaid romantic skirt

Three days into September, already?


Since I wore the same things these last two days, I figured one photo would be enough, so here I am in my around-the-house outfit. Me made items: pants, T-shirts and panties.

For the weekly "Plaid" challenge on The Sew Weekly I made this skirt.
Remember the fabric?


The plaid went from thrifted skirt to bottom of a discarded dress project to refashioned skirt. The coral red fabric comes from a scrap bag and the crocheted circle center of the rosette was made with remnants of embroidery thread. The zip and snap closure are from stash.


9/02/2011

Gran's green dress refashion

My grandmother's green dress from the 70s! Four sizes too big, I'm afraid...


I had to take it in - a lot, then shortened the sleeves, and changed the buttons. Oh, I felt lots of love and tenderness for her seeing every button sewed on with a different color thread. <3


Ciao!

8/31/2011

White skirt - refashioned!

I said I had something in mind to do with the bottom of this dress, remember?
I refashioned it into a skirt! What do you say?


Now, the story goes like this: The fabric came from my mother's vintage stash. Since I already had something similar in white, which I liked more, I decided to dye this piece. The fabric came out of the process with no coloring at all, just a couple of stains. So much about the content of synthetic fibers. Disappointed, I then decided to use it to make a test garment. As you know, that experiment didn't work either. But I had this brilliant idea of embellishing the whole skirt with ribbons of remnants of white fabrics! A closer look:


First I took the remnant pieces of white fabric and cut them into 2,5 cm wide ribbons, then I sewed them freely onto the skirt with a straight stitch. I started at the bottom and randomly applied piece after piece. I love how this skirt refashion turned out! :-) Fraying edges included!

Ciao!


P.S.
I named her Dottie White, heeeee! :-DD

8/18/2011

Underwear!

Yes yes, I'm working on my UFOs! There is still a number (!)of them...

But four less than yesterday :-)


FOs - Panties!
Knit scraps, old t-shirts, fold-over elastic and a piece of elastic lace.


7/03/2011

The nightgown to top refashion - Burda 12/2005-111

Another UFO down!

I realised that most of the UFOs on the pile are actually muslins. Which is a rather good news since I don't have to finish them completely. Unless they are wearable. Or I want to. There are several dress patterns I really want to get right, but that's for another day...

The after: top Burda 12/2005-111 (without the band and slightly lengthened).


I find it lovely. But the fabric is too crisp for this pattern. The front should drape softly,and here it sticks out if you don't flatten it down with your hand. Ah, well.. Next time I'll use some silk. Maybe even make a dress.

This is the before:


Coming back soon with a fun fun post!

I hope your weekend was fun and relaxing!

Ciao!

6/17/2011

Purple and dots dress refashion

From this:


My friend E's late grandmother's dress.

To this!!!!:


Loooveeee!!!!


E kindly gifted me with some of her grandmother's dresses. A couple of them I liked a lot (this one and a green one), while I took a few others to learn something about the construction. In fact, they were all handmade. I didn't find out who the seamstress was, though.

To refashion this dress I unpicked the side seams and sleeves, eyeballed the position of a dress pattern upon the dress pieces stretched on the floor and cut. There are times when one wants to have the dress - now! You know what I mean, right? :-) Then I sewed the side seams together and then(!) Z fitted it on me!!! He kindly agreed to help me. :-) Haha! So cute! It was his first time and he was very, very, very careful and excited. And he also did a great job, didn't he? I don't mind the wobbliness of the front. It was a plus size dress after all.

So, due to this method of refashion, the dress has two pairs of totally unrelated bust darts and back darts. The fabric is some sort of syntethic knit so there was no need for a zipper. And I used golden bias tape to finish the armscyes. From stash.

Finished in a minute! Or, as we say it here (literally translated)- finished while you say cookie! :-)

I'm sure this little number will be worn a lot. As soon as I shave my legs and get a bit of suntan. :-PP :-DD

Have you sewn something you loooove lately?

Have a good night!

6/09/2011

Crossover top refashion

Grandma gave me this one. It was enormous and had to be taken in a lot on both sides.


I did a stupid thing, though. Forgot to leave extra space for the hips, ehh... So it pulls up.


Fortunately it is a summer top! :-DDD

T-shirt refashion

Two finished objects from the UFO-refashion pile!

1. Simple basic white T-shirt

The pattern used is ..... I lengthened it 2.5 cm and did a slight sway back alteration but it looks like in need of some more, right? And also the shoulders need to be moved forward a bit.


Two different fabrics (shirts) were used for this one. Pique for the body, and plain knit for the sleeves and inserts. I used the front of the refashioned T to make the back because there was a big oval label I couldn't get rid of. So I used it to my advantage to design something nice.


Revers applique and tiny pearls on the right shoulder!

2. Pika-chu!

This one was refashioned from one ooold shirt of my brother's. So fun! I love the little lightning monster!


The pattern used is ..... in which I altered the sleeves to make them slightly puffed.


The back looks better than in the previous example. Let's see what happens when I wash them.

So, which patterns did I say I used???? Eh?? Can't even find them right now....Hmmmm...

9/02/2010

One small and one big refashion

Yay!

I certainly accomplished something today as well! Four items taken off the Reuse/Recycle/Refashion pile. All the notion were also reused.

The garments were also WIPs and UFOs, though.

An old boyfriend's shirt became baby pajamas:

P9010019 (2)

P9010015 (2)

And for the big refashion three pieces were used to make one:

2010-08-31_214327


P9010035 (2)

I can happily go to sleep now.

Good night!


Orange slippers

P2180046 (2)

P2180044 (2)

Much cuter than the last pair ! Still have to work on them, though. The elastic is not keeping them up properly. I'll have to insert it in a different manner on the next pair.


Yellow sweater reconstruction

Hello everyone! Here I come again after three exams, phew...

This morning I saw Elisabeth's post about her sweater reconstruction and got so excited I jumped out of bed, grabbed my yellow sweater, that was waiting in line for a refashion anyway, and was done with everything at about 11 o'clock.

I followed the instructions from the tutorial, but had to adjust them a bit because my sweater didn't have straight arm seams. It worked pretty well anyway.

The sweater:

Zuti dzemper stari cijeli

Cutting steps:

Zd1

This was to see how much to open the sleeves.

Zd2

Zd3

I had to cut the sleeves and body to even the seams.

Zd4

I serged the parts I cut and sewed it all together with narrow zig zag. Then I sprayed the wonky seam with water and ironed it flat.

The first time I sewed the sleeves to the body I did it the wrong way so I had to unpick the seams. Never mind, the result is gorgeous!

Zd novi cijeli ispred


Zd novi cijeli iza

Zd bok

Thank you Elisabeth, you are a genius!!